Pages

Showing posts with label crafty creations. Show all posts

Friday, April 6, 2012

Lampshade Makeover

It's a sad day when a gorgeous lamp like this gets ignored.


Most of the time, being cheap works well for me- not so much when I trim my own bangs- but that is the exception!  Years ago, I found a matching pair of green glass lamps at a garage sale and I was able to buy them both for $5 each.  I was sort of clueless, though, about what sort of lampshade to use.  


For a while I used this lampshade because it's one I already had and I figured I'd be inspired at some point.  I also knew the neck was way too long and I'd have to take the lamp apart and rewire it.  blech.   Unfortunately, I sort of stopped noticing the lamp and it stayed this way until my mom came for a visit and gently asked, "Would you like for me to buy a new lampshade???"  Uh, I guess it's time to do something different!

So, I went out and bought the most boring white lampshade on earth.  I also bought a cheap lamp at Goodwill and used a couple pieces as the new neck for the lamp.  And that's how it stayed for another year.

Theeeen, my friend, Kristie the Decorologist, posted this shabby chic lampshade tutorial and I figured, Why not do something about this boring lampshade?  What do I have to lose?  If I mess up I can always go out and buy another completely boring lampshade at any number of stores.

I watched a tutorial on youtube, got out some fabric I already had that I love and got to work.  

 I was really drawn to yellow for the trim color but it just didn't feel quite right.  My brilliant mother suggested trimming off the yellow balls off the bottom and voila.  The finished product.  

I absolutely LOVE my lampshade now!  I notice it every time I walk past and I think it has so much more personality.  I don't think I'll ever be happy with a boring white lampshade again.  


I even did another lampshade but I'll save that for another day!  

Wednesday, September 28, 2011

Feeling crafty

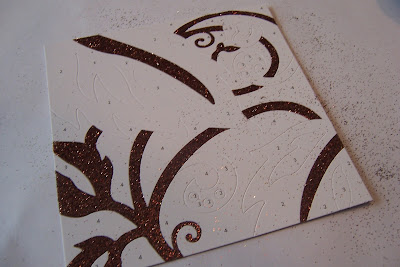
Can I do a whole blog post about glitter?  Yes, yes I can.  :-)  Last YEAR my sister-in-law, who's craftiness you can see here, gave me a glitter craft by Martha Stewart and I never even opened it.  Then, last week, in a desperate attempt to avoid falling sleep AND to avoid housework I pulled it out of the closet and felt like a kid.  A very sparkly kid.

These colors are puuurhfect for my house!

It was Glitter by Number!  Super easy but I did have to use my handy dandy Swiss Army Knife to pull the minuscule stickers off.   As I was squinting at the tiny numbers and feeling very clumsy I thought  of the Seinfeld episode where Jerry says, "She's got Man Hands!"  Yep, that's how tiny the stickers were.


1 number peeled off at a time, glitter added, and voila!


Almost dooone...


 As you can see, each glitter was numbered so it was a craft that even children could understand and enjoy!  


I'm pretty sure Michael's has glass frames that I can slide these into and hang up on the wall.  I'll post a picture of that when I get it done!  


Want to make your home a better reflection of you?  Contact me and we can make it happen!

Monday, March 14, 2011

bridal hair accessory

My younger sister is getting married!  I'm so thrilled for her and can't wait to go to the wedding this weekend.

Last month she asked if I would make hair clips for her because (in her own words), "You are good at that sort of thing."  Me?  Augh!  The pressure!  I don't know how to make hair clips so -of course- I agreed and then recommended she order something from Etsy and then I felt guilty so I put something together today.  I haven't actually seen the wedding dress besides what Sis sent me from her cell phone so I don't know if the hair clips are going to work but at least I did what I said I would do!

I found a gorgeous ribbon at JoAnn and cut it at about 10 inches in length.  Turned it into a rosette and added a fabulous brooch in the middle.  I think it's awesome, but it IS my first bridal hair accessory so I'm going easy on myself.  :)
I took this picture in bright sunlight but the ribbon is a nice soft white, not a stark crisp white.


Sis's plan is to curl her hair and pull it back on each side.  I think the clips will be a wonderful romantic detail!

Sunday, February 27, 2011

A bookshelf makeover

This isn't going to be a jaw-dropping before and after but I always like to see and share pictures of makeovers -however small they may be!

My friends gave me a couple bookshelves when I created a design plan for their office/gear room.  The bookshelves are handmade and although very sturdy, they weren't very cute.  I always imagined I would paint them fun colors but didn't get around to it....until I noticed that their daughter might benefit from a bookshelf in her room!  I was very open and honest that I was going to re-gift the bookshelf, hoping that that would make it less tacky.  (remember that next time you get a hideous sweater at Christmas....tactfully re-gift it as coasters!  ha ha!)   I painted the bookshelf for their daughter and it is perfectly adorable in her bedroom.

 Not much of a looker, bless its heart.  I sanded down the interior and exterior of the bookshelf to break down some of the glossy poly that covered the shelf so the paint would adhere better. 

 Next, I primed the interior of the bookshelf and then painted with semi-gloss Great Green (sherwin williams).  Since there is a lip around the front of the bookshelf it was easier to keep the line between the two colors nice and tidy.  Creating a line between two paint colors can be tricky so I lucked out!

For the exterior I used Silky White in the Behr paint and primer in one. Two coats of poly and we are ready to go! 
Some books and accessories and it is ready for use.  Now that my original vision has been realized for one of the bookshelves I need to apply some elbow grease and get the other one done for my son's room.  I just love how a little paint can give furniture a new lease on life!  

Wednesday, February 9, 2011

Iron craft challenge 6: Winter

When I think of winter I think of staying inside bundled up under cozy blankets, reading a good book and sipping a mug of hot tea.  If I had my druthers I would stay that way all winter- only venturing out to buy more tea and get more books from the library.  I am a winter hibernator!  Skiing? Ugh, no.  Sledding with the kids?  Only if I must.
 I like to be warm!
So, when the iron craft challenge was posted I immediately thought of warms drinks.  You know me!  How to make that thought into a craft, though?  I decided to make a Drink Station inspired by winter.


Step 1: Off to a good start, huh?  Don't worry, I have a vision for these amazingly awful 30 yr old prints from the thrift store. $2 is right up my alley!


Step 2: I took the cardboard print out of one of the frames and placed my hooks.  


Step 3: I used decoupage to cover the frame in pretty paper.  I liked the added interest of the red in the middle and you'll see what I chose for the backing!


Step 4: I painted the second frame but left the artwork intact.  There is a much brighter future here so don't lose heart.  (my apologies if you like the cardboard artwork)


Step 5: I added my hooks, backer, snow/glitter and a bird to the first frame (seems fitting that my space- heater is discretely sitting in the background!).  Finally, added my cups and hung it up!


Step 6: I painted over the print in the second frame with chalkboard paint.  Just about ready....!


Step 7:  I used picture wire to string curtain clips that can hold a variety of beverage options across the message board.  ( all that's lacking is a place for some whiskey)


 Voila!  Add a little message and the drink station is ready!  


Wednesday, February 2, 2011

A Mistletoe Valentine

Here's a fun little Valentine craft.  It's also one I actually made myself!  Believe it or not...

My friend Amanda mentioned a craft challenge at theironcraft.blogspot.com/and suggested I join the ranks of those trying to be creative and crafty!  So, this week's challenge is to make a Valentine and I decided to make a Mistletoe Valentine.  Fun and easy (how I think ALL crafts should be... but not all ladies -wink!)

I also entered this in a contest Valentine's Day Challenge so please leave comments!  They are my "votes" and I need votes to win!

I started out by cutting out 6 large hearts and tried to keep them as close to the same size as possible.  Anyone can do this part!

Next, I decorated each heart and strung some ribbon through each end.


this one says "meant to be" and "all you need is love"


This project is perfect for indecisive people!  You basically get to make 6 Valentine's cards for 1 person!


Knot all the ribbons together and what do you get?


The cutest most adorable Mistletoe Valentine.  Think my hubby will like it? ;)


disclaimer:  Usually I roll eyes at Valentine's day but I'm feeling the need to embrace any chances at creativity.  Happy crafting!

Tuesday, February 1, 2011

Valentine's Day inspired crafts

Well, it's February.  Time for pink, red, hearts, chocolate, candy, paper doilies and love.  Lots of love.  I found some super cute craft ideas to get this month kick-started!

This crayon heart sun-catcher is just what we need to brighten up the dreary days of winter.  Click here to view directions for making this adorable craft.
Crayon Hearts

This craft is fun and easy!  Click here for directions.
Sweet Spot Hearts

I got excited when I saw this one.  Definitely going to have a bouquet of these for the boys on Valentine's Day!  Click here for directions.


I saw this idea on a blog and thought it was chic, clever and SO simple!  Not so much a craft for the kids but it would still be fun to create!  The link to the creator of this idea wasn't working but I'm pretty sure it's just a heart wrapped in twine.  Might be a little time consuming but well worth it!


BUT, if you are like me and want to keep it super simple just cut out hearts from fun colored scrap paper, get out some glitter, find some stickers and have some fun!


This is my friend, Vanessa's daughter.  Click here to see her highly amusing blog!  Fun and easy and a great way to start the heart obsessed month!  (fyi, glitter defies the suction of vacuum cleaners!

Happy Crafting!

Tuesday, January 18, 2011

one canvas so many possibilities

Ok, so it's not really a canvas...it's a large piece of drywall.  I'm such a cheapskate that I wander the house looking for something I can be creative with instead of heading to Michael's to buy the item that would most logically fit my project.  I also don't really consider myself to be much of an artist so I don't think what I do warrants a real canvas!

My first attempt at making wall art for the living room was too dark and heavy  for me.  

My second attempt (after the room redo) was too light compared to the other pieces in the room.  As you can see, there is a large mirror in the room with a very thick frame.  The artwork was nice but better suited for a more whimsical space.


My third attempt may not be my last but I'll probably live with it for a while. (I need to hurry up and get those pillow covers sewn!  I love how they brighten the room.)

The wonderful thing about creating your own artwork is that you can try and try again!  

Thursday, November 4, 2010

murals

A mural is such a fun addition to a kid's bedroom.  I just love them!  The tricky thing is picking something that they won't outgrow quickly.
The mural is this room was so so so precious but not very appealing to a 4 yr old little boy who wanted a "big boy" room.  He absolutely loves Thomas and all things train related but do we want Thomas up on the wall for years?  Big fat NO!  Goodbye bunnies and hello retro rails!


This train almost takes up the entire wall of the bedroom!  It is cool and sleek without playing too much into the temporary Thomas phase.  We found this image on-line then used a projector to get the image onto the wall.  Lots of tracing followed by meticulous painting and we have a great finished product!


Here is a mural that I had a professional artist do in a playroom.  I designed the mural but had to commission someone who is far more talented at painting than I am!

Devon (Simply Artistic) did a great job making a mural of just silhouettes come to life.

Like I said, I love murals and the creativity they bring to a room!

Friday, October 22, 2010

as luck would have it

I had been searching for a good deal on solid wood dining room chairs-with a cushion seat- for MONTHS and finally stumbled across my diamonds in the rough in rural Indiana.  Leaving my mother-in-law's house we drove past a house having a garage sale and I could see 4 chairs balanced precariously on a hill so we made a quick U turn and I braved a ferocious Pitt Bull to get a closer look.  Perfect.  I bought all 4 chairs for $20 dollars!  I still squeal when I think about what an amazing deal I got!

I also got more than I bargained for.  The crackle finish on the chairs would not be sanded down so I had to resort to toxic paint stripper.  Ug.  What a messy dangerous job!  Can I just say that it is never as easy as the can tells you it will be!


Finally, the chairs have realized their potential and I love them.  It's amazing what a little elbow grease can do!

Here are 2 of the chairs in my dining room.  Yes, I make my kids sit in cheap Ikea chairs with washable cushions.  Hey, it's better than using plastic seat covers!

side note: the buffet is an Ikea buffet that looks fine as is but I wanted to give it a little more character.  I found a sheet of grass-cloth wallpaper and taped it to the doors (yes, taped..that way, I can change my mind and have very little work to do!).